Search This Blog

Showing posts with label Craft. Show all posts

Sunday, 11 August 2013

Crocheted Granny Square


Makes a Granny Square 8cm Square

Use a size 4mm Hook (can use any size hook, but it will alter the size of the finished product)

Use double knitting wool (can use any type of wool, but it will alter the size of finished product)

Round 1
ch 4, sl st to first chain to form a ring.
Ch 2 (counts as a treble) 2 tr into ring
1 ch 3tr into ring, 3 times, 1 ch
Join with sl st to top of starting chain
Fasten off if changing colour

Round 2
Sl st a new colour if wished in any ch in a corner
2ch 2 tr 1 ch 3 tr  into same ch space in corner
3tr 1ch 3tr into next corner ch 3 times
Join with sl st to top of starting chain
Fasten off if changing colour

Round 3
Sl st a new colour if wished in any ch in a corner
2ch 2 tr 1 ch 3 tr  into same ch space in corner
*3tr into gap between 2 3tr groups
3tr 1ch 3tr into next corner ch
Repeat from * ending with 1 ch
Join with sl st to top of starting chain
Fasten off if changing colour

Round 4
Sl st a new colour if wished in any ch in a corner
2ch 2 tr 1 ch 3 tr  into same ch space in corner
*3tr into gap between 2 3tr groups
3tr 1ch 3tr into next corner ch
Repeat from * ending with 1 ch
Join with sl st to top of starting chain
Fasten off

If you want a larger Square just continue rounds until it is the required size.

Finishing
Weave in all the ends.

Assembly
Working with 2 squares, hold right sides together, work through both layers,  join with sl st in the corner ch, sl st along shared edge, sl st in next corner, continue in this way until you have finished required item.


Abb
Ch = Chain
Sl st = Slip Stitch
Tr = Treble

Friday, 26 October 2012

Decision time

When i visited an Age UK customer yesterday, i was asked if i could go privately as she didn't really want to go through an agency, she first contacted Red Cross, filled in the forms, asked when they could start and they said they had no volunteers, then AgeUK became involved, and she only booked 2 sessions.

So when i got home i discussed it with Bob and checked my staff handbook.  The only reference in the Staff Handbook read

It is important to remember that you are visiting customers as an employee of AgeUK Norfolk and not as a Private Individual.  You must therefore not undertake any additional privately arranged services outside the service agreed in the Menu of Services and coordinated by AgeUK Norfolk.  Any requests for additional services should be reported to your line Manager.
The customers Menu of Services stress it is for 2 hours only, so because of that i read that after the 2 hours has been completed,  i have no further obligation to AgeUK Norfolk.

We also got talking about craft she is in a wheelchair and does beading, but has no outlet, i discussed my cross stitch and she asked if it is possible for her to pay half of the stall and i display her goods and she pays me a commission, this will reduce my overheads, add interest to my stall, and i may even earn some money, can't be bad.

Sunday, 7 October 2012

Christmas Lantern


1 roll of masking tape
10+ pea sticks approx 24" long
tissue paper
PVA adhesive
2 pieces of stiff wire
1 sponge
garden cane to hold lantern from
1 small lightweight battery powered torch/tealight

Method: (use masking tape at each joint)
Start by making two isosceles triangles using your sticks
Join the two triangles at their apexes and add two sticks to form a square base. Then add two more sticks across the diagonals of the base This should give you a basic pyramid shape with a cross on the bottom to strengthen it. You then need to make a small door so that you can access your light.You can then continue adding to this shape to create your own design.
Once happy with the shape of your lantern use the two pieces of wire to make a secure carrying loop at the top of the lantern and a hook inside the lantern to hold the torch/tealight inside.
Using a sponge start to apply PVA to one side of the tissue paper working away from yourself. Attach the paper to the lantern overlapping. Do the sides first, then the base and the door last.
(PVA is best diluted with water 2:l to obtain a good working consistency) When it's completly covered, leave to dry overnight.
The finished lantern can then be attached to a garden cane by the wire loop. Insert the tealight through the door, turn it on and you are ready to join the procession.

Saturday, 7 April 2012

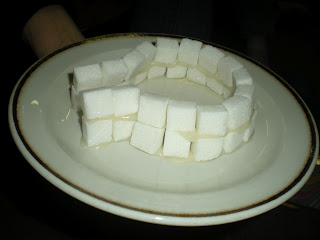
Sugar Cube Igloo

During Pack Holiday Sue and Debbie lovingly made an igloo from Sugar Cubes and Icing, then the Brownies made Marzipan Penquins to decorate it.


Sunday, 17 April 2011

How to make Paper Palm Tree

Need: newspaper ( 2 double pieces), tape, scissors
Open and lay the 2 pieces of newspaper out flat. Take sheet 1 and begin rolling it into a tube.

When you reach the center of sheet 1, add sheet 2. Continue rolling until both are rolled into a tube.
Secure the loose ends with tape. Starting at the top of the tube, cut through all surfaces to halfway down the tube. Make 3 to 4 additional cuts.
Starting from the center, gently pull up on the paper. The leaves of the tree will begin to grow.

How to make Palm Crosses

To Make the Knot in the middle


1.     Hold the palm horizontally.

2.     At about the half waypoint fold the palm up towards the ceiling to create a ninety-degree angle.
3.     Take this piece and fold it tightly down towards the floor. (Do not try to make the cross. At this point you are making the square in the middle).


4.     Still using the same piece of palm, fold it back up toward the ceiling.
5.     Take the other piece of the palm and fold it across the square you have been creating.
6.     You will now take this same piece of palm and thread it through the small square you have created. This square is at the back of the cross and you will see the right angle you originally created in this square – thread the palm under this right angle piece.
7.     Pull tightly and you should have a completed knot that does not need to be held.

To Form the Cross


1.     Take the palm that points towards the ceiling and fold it down toward the floor and thread it through the square you have created at the front of the cross. This will be the top of your cross.
         
2.     Still using the same piece of palm thread up back up through the same square you used in the previous step to create the bottom of the cross.
3.     Turn the half made cross around so that the remaining horizontal piece of palm is to the right. You should have a vertical square in front of you and a horizontal piece of palm to your right. Take the unwoven piece of palm and thread it through this square to create one side of the cross.


4.     Take the same piece of palm and thread it through the same square you used in the previous step making certain to thread it behind where you had previous threaded. You should have a cross that still has some palm pieces hanging out either on top and sometimes in the sides of the cross.
5.     Cut the strands that do not belong in your cross.

Wednesday, 9 March 2011

Junior Church

On Sunday i went down to Junior Church with Ruth, although this is not what i wanted or planned for me because of missing church, it felt good and right.

Ruth often uses salt dough to demonstrate a point, she gave me the recipe.


Salt Dough (Play Dough)
2 Cups Plain Flour
1 Cup Salt
I Cup water added slowly until you have a pliable dough.

Knead it well – keep in air tight container for upto 3-4 weeks.
Dry hard in a very low oven cooked very slowly 2, 3, or 4 hours, depending on thickness of dough.